Home
How to Draw a Goku Outline With Perfect Proportions and Style
To create a professional Goku outline, focus on these five core elements:
- Skeletal Foundation: Use the 8-head proportion rule to establish height and muscle mass.
- Facial Geometry: Construct eyes as sharp rectangles and the nose as a small, shaded triangle.
- Hair Enclosure: Ensure all spiky hair points are fully closed silhouettes to maintain the iconic look.
- Line Weight: Use a "G-pen" style (thick in the middle, thin at the ends) for a manga-accurate finish.
- Form Selection: Decide between Base, Super Saiyan, or Ultra Instinct before starting the hair map.
Creating a precise Goku outline is the fundamental skill required for any Dragon Ball fan artist. While there are nearly 95,000 Goku-related assets available on professional stock platforms , learning to draw your own custom line art provides a level of character and nuance that generic templates often lack. Whether you are aiming for a clean digital vector or a traditional pencil sketch, the secret lies in understanding the geometric foundations established by Akira Toriyama and refined by modern artists like Toyotaro.
In this guide, we will move beyond simple tracing. We will explore the technical differences between anime and manga styles, the skeletal rules for Saiyan anatomy, and the specific line-work techniques that separate amateur sketches from professional-grade illustrations. By following a structured "Skeleton-to-Vector" workflow, you can ensure your Goku outline remains proportional, dynamic, and ready for coloring or digital use.
Building a Proportional Skeleton for Your Drawing
One of the most common mistakes beginners make when attempting a Goku outline is starting with the eyes or hair. Without a proper frame, the drawing often ends up with a head that is too large or limbs that lack the characteristic Saiyan bulk. To avoid this, you must build a "Stick Man" foundation first.
Why You Should Start With a Skeletal Frame
Goku’s physique is built on a specific "8-head" proportion rule. This means the total height of the character should be roughly eight times the height of his head. According to Sanju Arts , establishing this skeletal frame allows you to map out the oversized muscle groups before committing to the final line art. Start by drawing a small oval for the head, then a vertical line for the spine, and horizontal bars for the shoulders and hips. This ensures that even in complex action poses, the anatomy remains consistent.
How to Position the Head and Torso for Action Poses
Once the basic height is set, focus on the torso. Goku’s upper body is traditionally shaped like an inverted triangle, tapering down to a narrow waist. When drawing the neck, use two parallel lines that extend slightly outward as they meet the trapezius muscles. This creates the "powerful" look associated with the character. For the clothing foundation, draw a wide "U-shaped" tunic opening that sits symmetrically between the collarbones. This skeletal mapping prevents the clothing from looking flat or misaligned with the body’s movement.
Mastering the Iconic Goku Face Outline
The face is where the Dragon Ball aesthetic is most distinct. Unlike many other anime styles that use soft, rounded features, Goku’s face is defined by sharp, geometric precision. Mastering these shapes is essential for a recognizable outline.
How to Draw the Rectangular Eye Shape
Goku’s eyes are not circular; they are essentially slanted rectangles. To draw them correctly, start with two narrow triangles for the eyebrows, which should slant downward toward the nose to indicate focus or intensity. The eye frame itself sits directly beneath the brow. According to Easy Drawing Guides , the pupils should be small dots or circles that do not touch the bottom of the eye frame, giving him a "piercing" look. Consistency in this rectangular style is a top-tier requirement for capturing the Z-era aesthetic.
Where to Place the Nose and Mouth for Proper Expression
The nose in a Goku outline is often simplified into a small, shaded triangle. It should be placed relatively close to the eyes to maintain the compact facial structure typical of Saiyans. For the mouth, a simple slightly curved line is often enough for a neutral expression, but for action poses, a wide "V" or a grimace is used. The chin must be a sharp, defined "V" shape. If the chin is too rounded, the character will look more like a child (Gohan) rather than the mature Goku.
How to Draw Goku’s Ears With Simple Curved Lines
Goku’s ears are larger than average and sit between the brow line and the bottom of the nose. The outline of the ear should be a series of C-shaped curves. Inside the ear, use a "Y" shaped line to represent the inner ridges. This level of detail is a hallmark of Toriyama’s style and helps the outline feel grounded in the official character design.
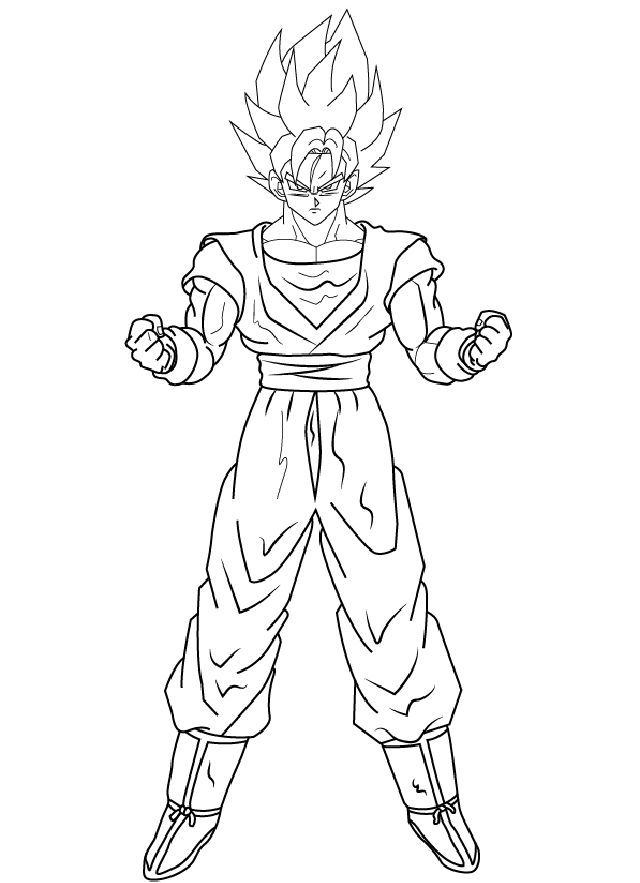
Image source: Pinterest
Mapping Out the Spiky Hair Silhouette
Goku’s hair is perhaps his most defining feature. It is not just "spiky"; it follows a specific logic that changes with his transformations. A common choice for artists is to draw the central spike first and build outward.
How to Draw Base Form Hair With Jagged Points
In his base form, Goku’s hair consists of seven primary spikes. These are "unruly" curved lines that meet at sharp, jagged points. The hair should appear to have volume, standing off the scalp rather than lying flat. Ensure that every spike is a fully enclosed shape in your outline. If the lines don't meet, the hair will lose its iconic silhouette when you transition to inking or digital vectorizing.
What Makes Super Saiyan Hair Outlines Different
When Goku transforms into a Super Saiyan (SSJ), the hair outline changes significantly. Instead of hanging slightly downward or to the sides, the hair is swept upward in flame-like spikes. The forehead line also changes; the hair pulls back, revealing more of the brow ridges. According to MC Draw Anime , the spikes in SSJ form should be more numerous and sharper than in the base form, often featuring internal "split" lines to indicate the intensity of the golden aura.
How to Outline Ultra Instinct Hair for a Shimmering Effect
Ultra Instinct (UI) presents a unique challenge for the outline. While the shape is similar to the base form, the hair is more fluid and less rigid. The spikes are slightly more elevated but retain a "softer" edge compared to the jagged SSJ style. When outlining UI hair, focus on thinner line weights and more frequent "stray" hair strands to simulate the shimmering, silver effect of the form. This form is widely considered one of the most aesthetically pleasing to draw because of its balance between the base and SSJ silhouettes.
Choosing Between the Manga and Anime Art Styles
A significant advancement in your drawing ability comes from recognizing the difference between the "Toyotaro" (manga) and "Toei" (anime) styles. While they represent the same character, the outlines carry very different moods.
Toyotaro’s outlines are leaner and sharper. The brow ridges are more pronounced, and the muscle definition uses more "hatching" (short parallel lines) rather than solid blocks. This style is often preferred for a "mature" or "serious" look.
The Toei anime style, especially in filler episodes, uses softer, more rounded edges. The outlines are often thicker and more uniform, designed for ease of animation. This is a top choice for "child-friendly" or classic 90s-style art.
According to discussions on the Kanzenshuu Forum , fans often note that the manga style feels more "smarter and more mature" due to the tighter facial geometry. When creating your outline, decide which era you are referencing. A "Z" era outline will have much bulkier muscles and broader faces, while a "Super" era outline (especially the Shintani style from the Broly movie) will be leaner and more fluid.
Comparing Goku’s Transformation Outlines
To help you choose the right starting point for your drawing, refer to the table below which compares the outline requirements for Goku's various forms.
| Form | Eye Shape | Hair Direction | Muscle Definition |
|---|---|---|---|
| Base Form | Rectangular / Relaxed | Down & Outward | Standard / Balanced |
| Super Saiyan (SSJ) | Sharp / Fierce | Upward / Flame-like | Bulky / Defined |
| Super Saiyan 4 | Circled / Shadowed | Long / Wild | Heavy / Fur-textured |
| Ultra Instinct | Silver / Focused | Fluid / Elevated | Lean / Extremely Defined |
Drawing Clothing Folds and Muscle Definition
An outline is more than just a silhouette; it includes the internal lines that define form and depth. For Goku, this means mastering fabric folds and the specific way Saiyan muscles are contoured.
How to Use Overlapping Curved Lines for Fabric Folds
Goku’s gi (tunic) is made of heavy fabric that bunches at the joints. To draw these folds, use overlapping curved lines. For example, at the elbow or the belt line, draw one curve that "tucks" under another. This creates a 3D effect without needing any shading. Avoid drawing straight, jagged lines for clothes; instead, think of the fabric as wrapping around the cylindrical shapes of the arms and legs.
Where to Place Core Shadows and Hatch Patterns
Even in a pure line-art outline, you can indicate shadow. Use "hatching"—a series of short, parallel lines—to contour the cheeks, the underside of the jaw, and the major muscle groups like the deltoids and pectorals. According to MC Draw Anime , these lines should follow the direction of the muscle fiber. This technique adds a professional "manga" feel to the outline and provides a roadmap for where to place darker colors later.
Creating a Clean Digital SVG Outline
For many modern artists, the goal is to translate a physical sketch into a digital vector (SVG). This is a highly recommended workflow for creating tattoo stencils, stickers, or high-resolution prints.
- Scan or Photograph: Take a high-contrast photo of your pencil sketch. Ensure the lighting is even to avoid "ghost" lines.
- Import to Illustrator: Place the image in Adobe Illustrator. You can use the "Image Trace" feature, but for a professional result, the "Pen Tool" is a top-tier choice for manual tracing.
- Adjust Stroke Profiles: Once traced, apply a "Variable Width Profile" to your strokes. This automatically creates the tapered "G-pen" look mentioned earlier.
- Simplify Paths: Remove unnecessary anchor points to ensure the SVG is clean and scalable without losing detail.
If you are using Procreate on an iPad, look for "tapered" brushes or specific "Inking" sets. Many artists find that a brush with high "Streamline" settings helps in creating the long, smooth curves required for Goku’s hair and jawline. This digital transition bridges the gap between a rough idea and a commercial-grade asset.
Key Takeaways for a Perfect Goku Outline
- Start with a skeletal frame using the 8-head rule to ensure anatomical accuracy before adding detail.
- Use rectangular eye frames and narrow triangular brows to capture the intense Dragon Ball aesthetic.
- Enclose all hair spikes as solid shapes to maintain a strong, recognizable silhouette.
- Vary your line weight by tapering the ends of your strokes to mimic professional manga inking.
- Choose your style era (Toyotaro vs. Toei) to determine if your outline should be sharp and lean or rounded and bulky.
- Incorporate fabric folds using overlapping curves to give the clothing a sense of weight and depth.
- Vectorize for versatility if you plan to use the outline for commercial purposes like stickers or tattoos.
Grab your pencil or tablet and start by sketching the basic skeletal frame to establish the perfect proportions for your first Goku outline.
Frequently Asked Questions
- How do you draw a Goku outline for beginners?
- The most effective way for beginners to start is by using the "Stick Man" method. Instead of focusing on the face first, draw a simple skeletal frame to establish the height and shoulder width. Once the frame is set, add basic geometric shapes: a V-shape for the jaw, a rectangle for the torso, and cylinders for the limbs. This ensures your proportions are correct before you add the iconic spiky hair and rectangular eyes.
- What is the easiest way to draw Goku's hair outline?
- To simplify the hair, start by drawing the central spike that sits right between the eyes. From there, build the hair outward symmetrically. For his base form, remember there are usually seven main spikes. Focus on making each spike a "closed" shape where the lines meet at a sharp point. If you are drawing Super Saiyan hair, imagine the spikes are like flames reaching upward, and keep the points jagged and sharp.
- Where can I find a Goku full-body outline template for printing?
- While many sites offer templates, professional-grade outlines can be found on platforms like Shutterstock or specialized drawing sites like Easy Drawing Guides. These sites provide high-resolution vectors that are perfect for tracing or coloring. If you want a custom look, it is often better to use these templates as a proportional reference while hand-drawing your own unique pose to avoid a "stiff" appearance.
- How do you draw a Goku face outline step-by-step?
- Start with a circle and a vertical line down the center. Draw a sharp V-shaped jawline at the bottom. Next, place the eyebrows as two downward-slanting triangles. Directly beneath them, draw the rectangular eye frames. Add a small shaded triangle for the nose and a simple line for the mouth. Finally, add the large C-shaped ears on the sides, aligned between the brow and the nose, to complete the facial structure.
- What are the proportions for a Super Saiyan Goku outline?
- In Super Saiyan form, the hair adds significant height to the character, often increasing the total head height by about one-third. The muscles also become more defined and slightly bulkier compared to the base form. However, the core "8-head" rule still applies to the body. Ensure the neck is thick enough to support the larger hair silhouette, as a thin neck will make the Super Saiyan head look unnaturally heavy.